
Manual A2P SMS Registration (Standard Setup)
If you are managing your own technical setup, you are responsible for submitting your A2P 10DLC registration through the ClinicMonk dashboard.
Before starting, ensure you have completed the website updates to your Privacy Policy, Terms of Service, and Opt-In Forms.
A2P - Standard Brand Registration for 10DLC
To comply with carrier requirements for Application-to-Person (A2P) messaging in the U.S., all businesses using 10-digit long code (10DLC) messaging must register their brand. This article explains the process of registering as a Standard Brand, which is required for most U.S. based businesses with a valid EIN (Employer Identification Number).
What is A2P Standard Brand Registration?
A2P messaging refers to any message sent from an application to a person — for example, automated marketing texts or appointment reminders. To send A2P messages in the U.S., you must register your brand and campaign(s) with The Campaign Registry (TCR) through your messaging provider.
A Standard Brand is designed for businesses registered with an EIN. It allows greater messaging throughput and access to a wider variety of campaign use cases than Sole Proprietor brands.
Note: If your business does not have an EIN and only has one employee per company, please contact support@clinicmonk.com.
Key Benefits of Registering as a Standard Brand
- Higher message throughput compared to Sole Proprietor Brands.
- Required for LLCs, corporations, and most U.S. and Canadian businesses.
- Improved trust score potential through EIN and BN9 verification.
- Enables access to broader campaign use cases.
- Lower chance of carrier filtering or message rejection.
What Are the Requirements for Standard Brand Registration?
Before registering, ensure you have the following:
- Business Legal Name (must exactly match IRS records)
- Valid EIN (Employer Identification Number) – U.S. or Canada BN9 (Business Number)
- Business Type: LLC, Corporation, etc.
- Business Industry
- Official Business Website
- Business Address
- Business Contact Information
- Authorized Representative's Name, Title, Email, and Phone Number
How to Register for A2P as a Standard Brand
Follow these steps carefully to complete your Standard Brand registration:
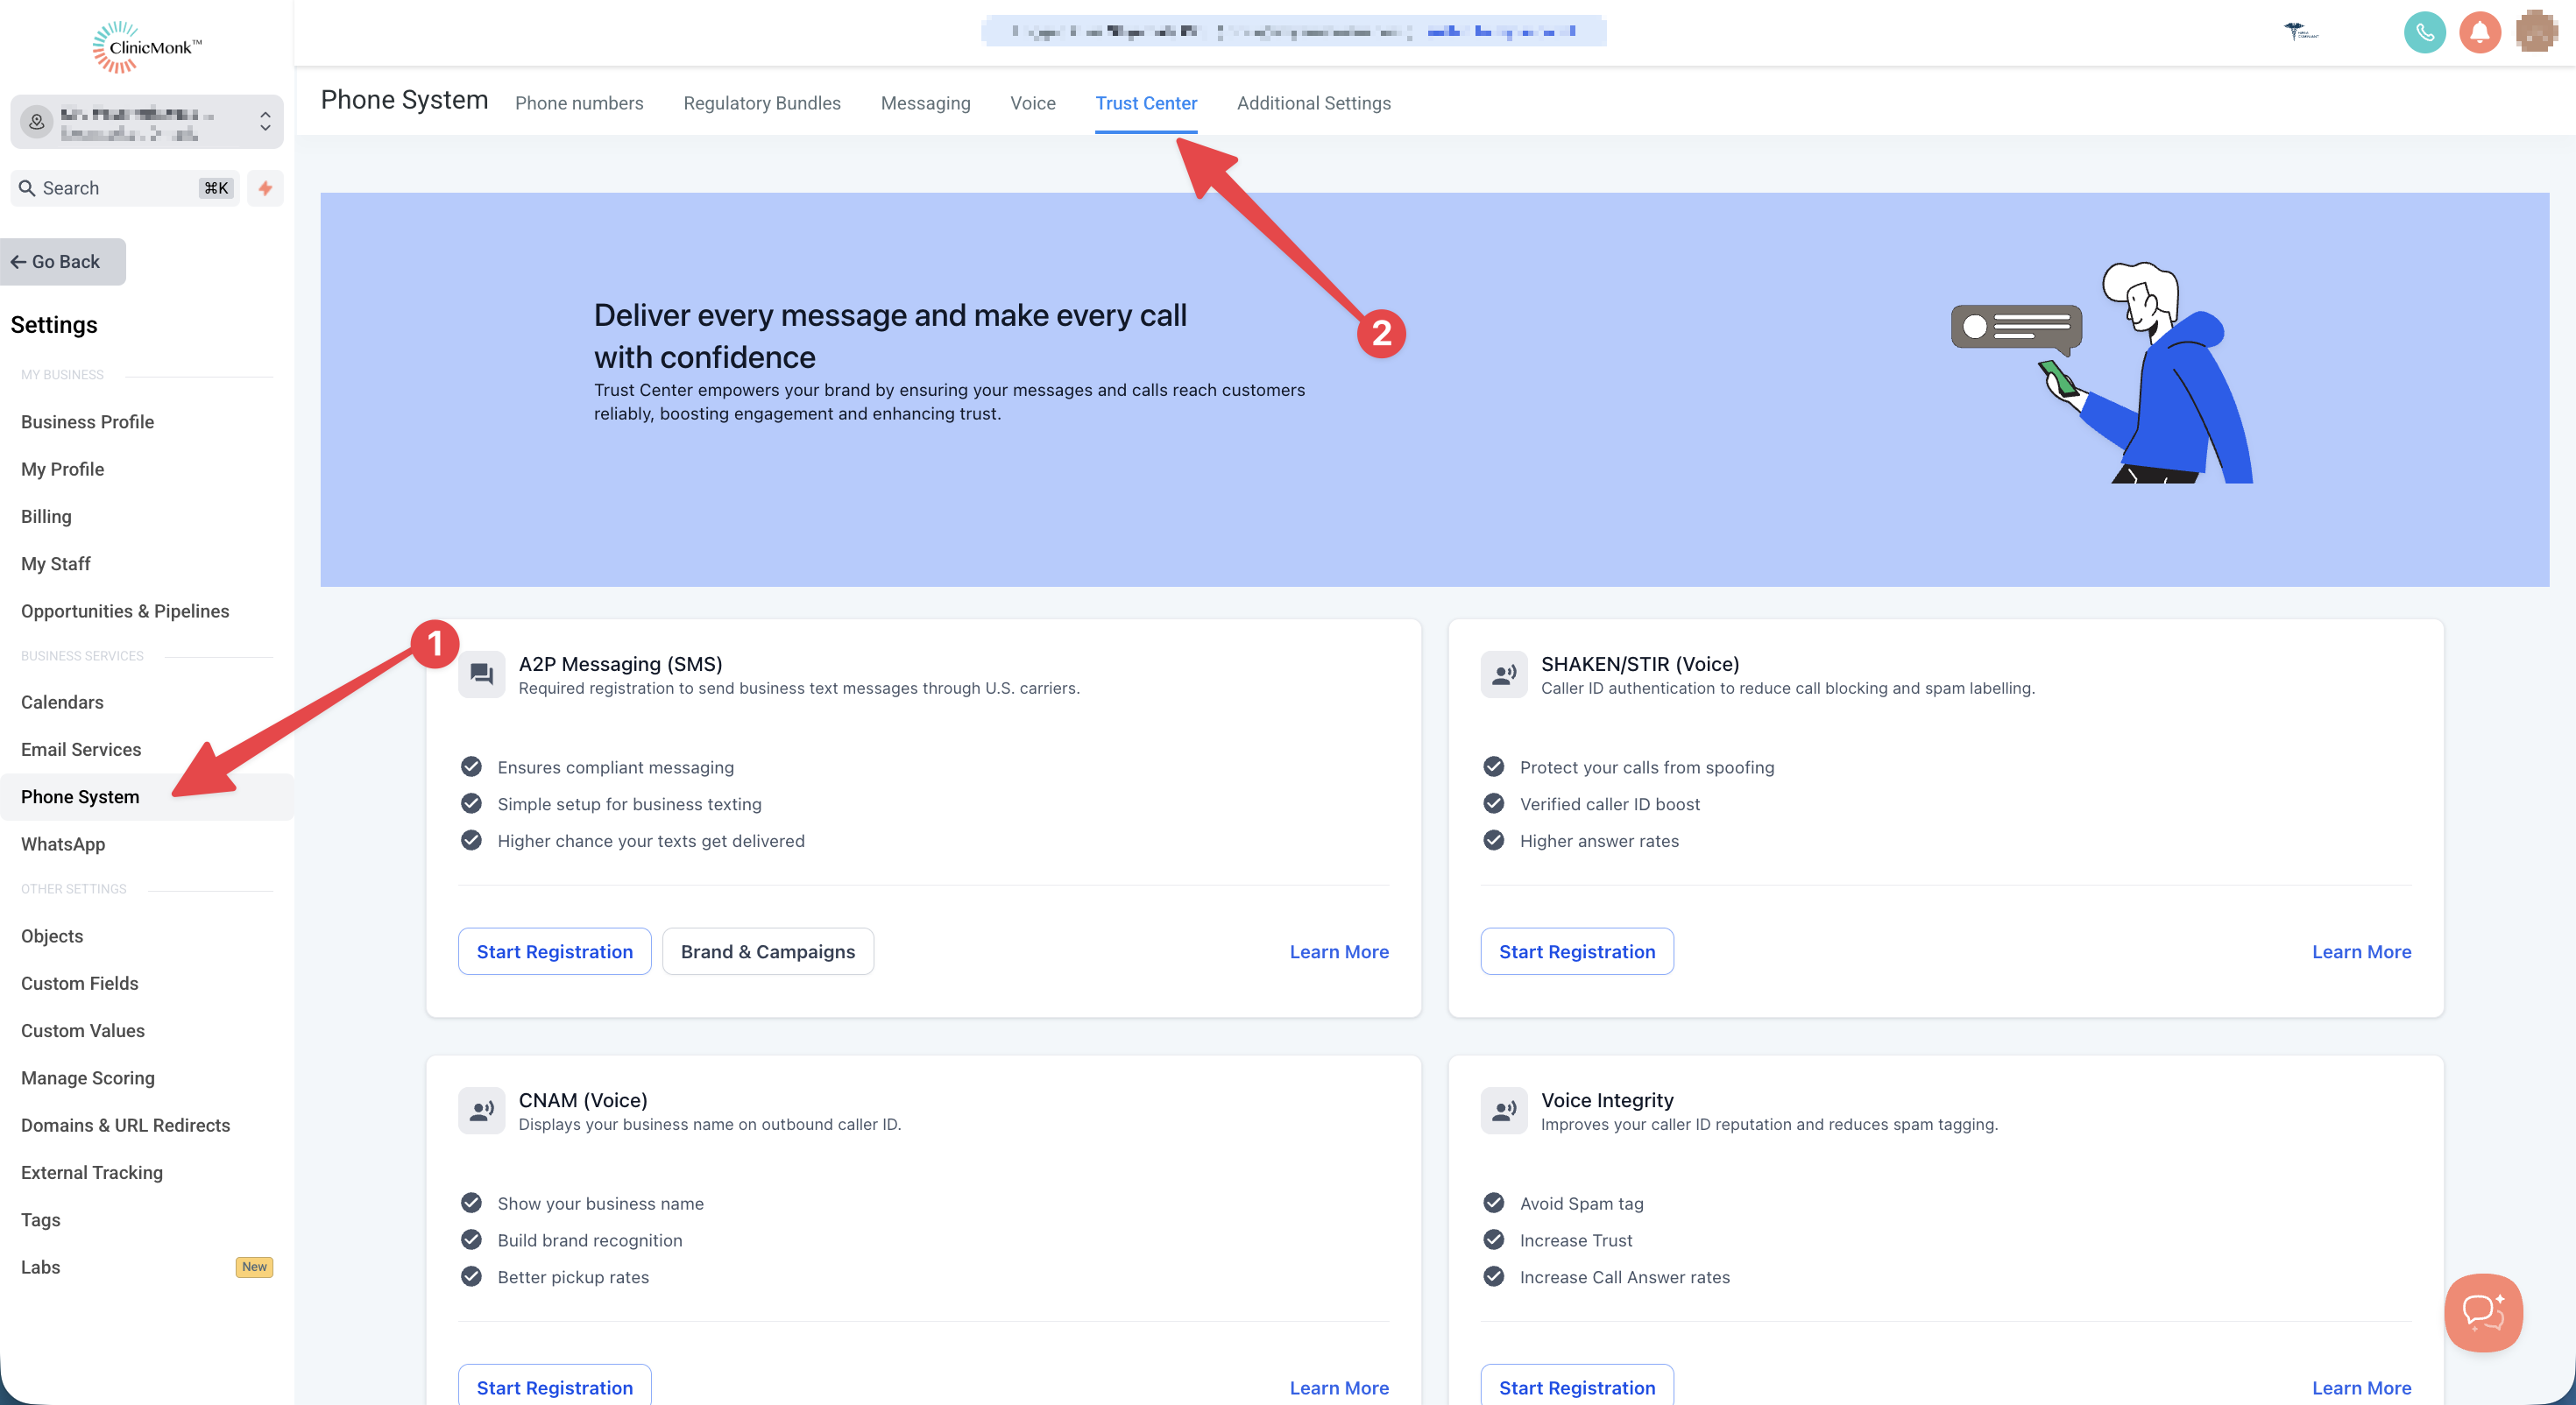
Step 1: Navigate to Trust Center
- Click on Settings from your sub-account.
- Select Phone System under Business Services.
- Click on the Trust Center tab.
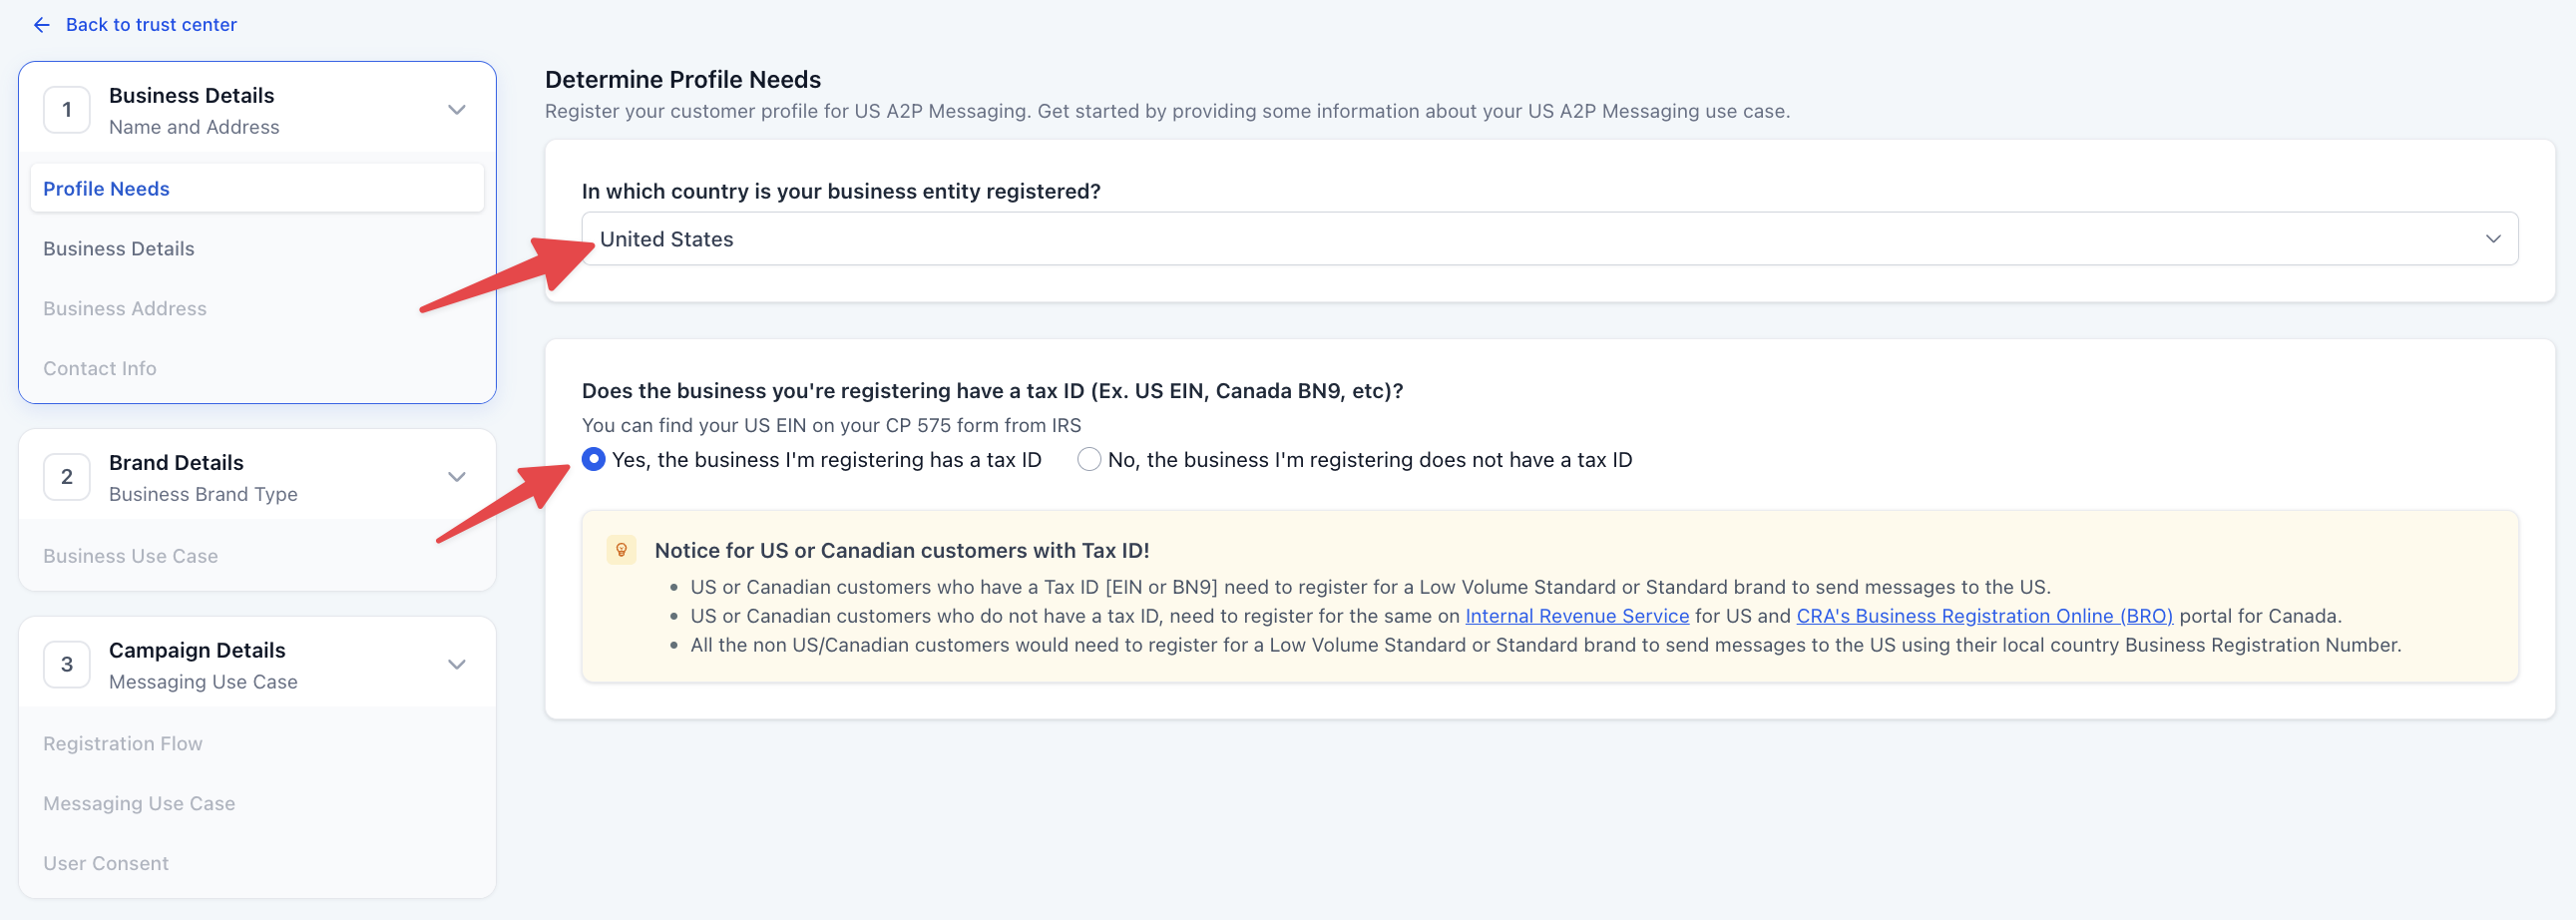
Step 2: Determine Profile Needs
- Click on the Start Registration button under A2P Messaging (SMS) tab.
- Select United States or Canada from the "In which country is your business entity registered?" dropdown.
- Select 'Yes, the business I'm registering has a tax ID' option from the "Does the business you're registering have a tax ID (Ex. US EIN, Canada BN9, etc)?" section.
- Click on Continue.
Step 3: Add Business Details
These details are important for your A2P Approvals: ClinicMonk will submit this information to The Campaign Registry (TCR) during the registration. Based on this information, TCR will approve or reject the registrations, so please make sure all the details exactly match those in your US EIN listing (or your country Tax ID form). If there are any differences - for example, in the business name, number or address - your application would be rejected. DUNS for USA and CCN for Canada are not accepted for A2P Registration.
- Enter Legal Business Name as registered with the Government and mentioned in your tax documents (W2, W9 or CP 575). E.g. ClinicMonk LLC rather than ClinicMonk.
- Enter your Business Type from the list.
- Choose your Business Registration ID Type from the list.
- Enter your Business Registration Number as per your country.
- Select your Business Industry from the list of available industries.
- Enter your Business Email.
- Add your Website URL.
- Select your Business Region of Operations from the list.
- Click on Continue.
Important: A2P Brand registrations using newly generated US EINs (registered in the last 15 days), may be rejected by TCR.
Step 4: Add Business Address
- Select your Country.
- Select your State/Province/Region. (The address provided here should match the address mentioned in the cp575 form (US Only))
- Add Street Address. (Must be a valid address linked to your business. Please don't add a P.O box in the Street Address)
- Add your City. (The address provided here should match the address mentioned in the cp575 form (US Only))
- Enter your Postal/Zip code. (The address provided here should match the address mentioned in the cp575 form (US Only))
- Click on Continue.
Step 5: Add Contact Information of Authorized Representatives
This can be any person that can answer questions about this brand, if needed. Please note that you cannot reuse contact information between brands. Each brand you create must have unique contact information.
- Add Authorized Representative's First and Last Name.
- Add Email Address.
- Add Phone Number.
- Select your Job Position from the list of designations or select Other and type in your designation.
- Click on Continue.
IMPORTANT: Once you click "Continue" or submit your contact details, you may have to validate this through an OTP sent to your email address. It validates each email address by sending a unique 6-digit one-time password to ensure the sender's identity is genuine. This new step strengthens the integrity of brand registrations and helps protect the platform from misuse without disrupting the experience for legitimate users. For more, refer to Email OTP Verification for Secure A2P Brand Registration.
Step 6: Choose Your Business Use Case
The Business Brand Type will be automatically set to "Low Volume Standard" based on the responses provided under Profile Needs.
Note: A2P Registration Fee Pricing is accurate as of August 2, 2025
Select Low Volume Standard
It is designed for businesses with a valid EIN or BN9 that need moderate-scale messaging capabilities using 10DLC. This is the required option for the ClinicMonk platform.
- Requires a valid EIN (Employer Identification Number) or Canadian BN9
- Supports multiple phone numbers
- Allows up to 6,000 SMS segments per day
- One-time registration fee of $24.49875 (includes $3 Fast Track fee for approval within ~3 business days)
- Additional campaign fee up to $11.025 per month will apply in accordance with TCR rules for both failed and approved campaigns.
Click on Continue.
Step 7: Registration Flow
On the Registration Flow screen, you will be asked to choose how you want to set up your campaign.
- Select Manual setup.
- Click on Continue.
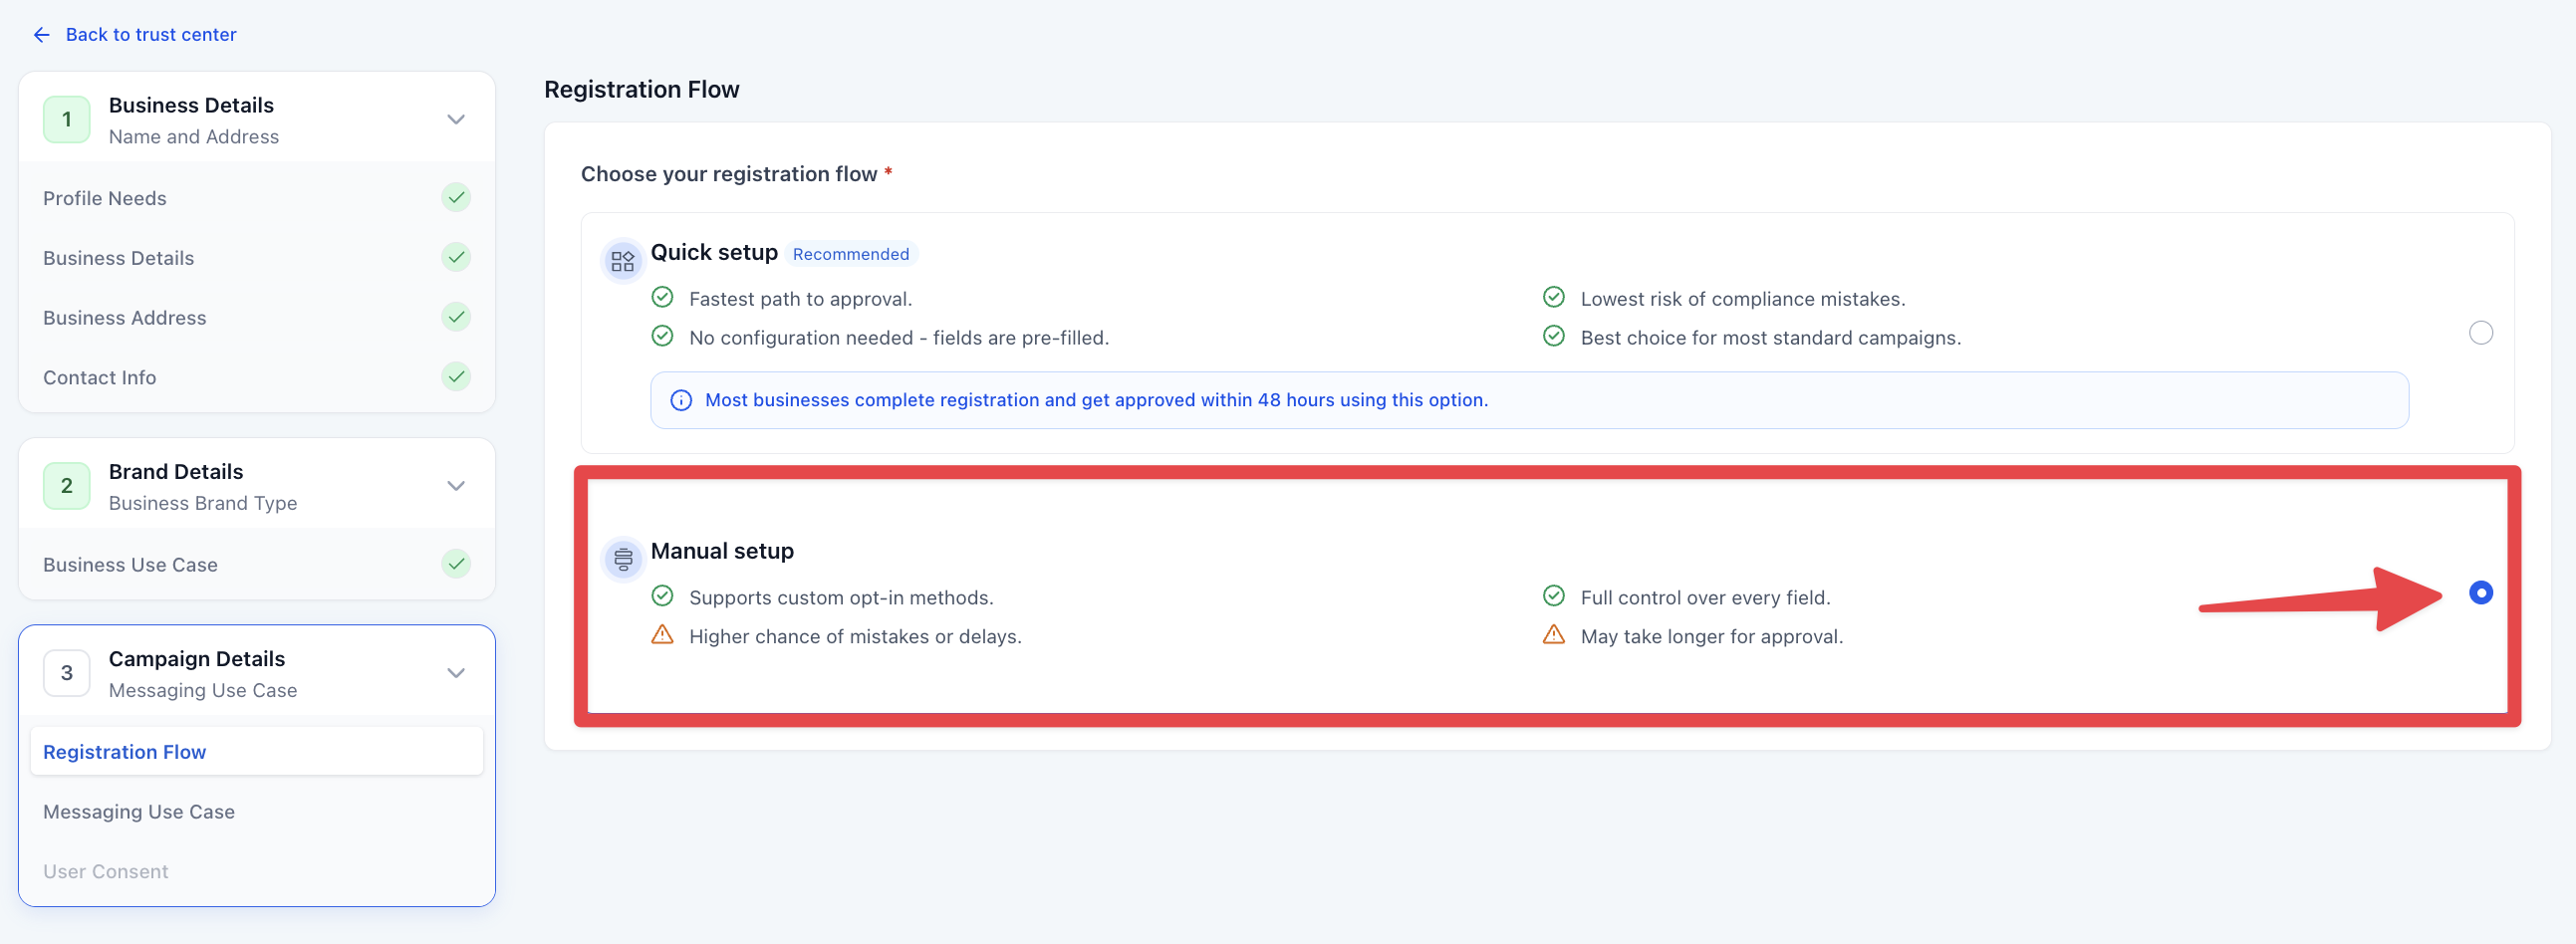
Note: While "Quick setup" is stated as recommended, the ClinicMonk platform requires Manual setup to ensure full control over custom opt-in methods and field configurations.
Step 8: Add Campaign Details
-
From the Campaign Use Case dropdown, select Customer Care. You can also select a specific use case as per your need from the list.
In the Use Case Description field, explain what the campaign will be used for.
-
Example: [Legal Clinic Name] provides appointment reminders, service updates, and direct client support. SMS messages are sent only to clients who have explicitly opted in via our website contact forms, booking page at [Clinic Website], or by initiating a direct text or call to our phone line. Communications include appointment confirmations, follow-up on service inquiries, and administrative notifications related to current client matters. This campaign is strictly for transactional client care and does not include promotional or marketing content.
Add Sample Message #1
In the Sample Message #1 field, provide an example message: "Hi John! This is Jane from [Legal Clinic Name]. Our appointment for July 20 at 11:00 AM is confirmed. Please reach out to [Clinic Phone Number] if you need to reschedule. Reply STOP to unsubscribe."
Add Sample Message #2
In the Sample Message #2 field, provide an example message: "Hey Brian! This is Jane from [Legal Clinic Name]. I see you weren't able to make it to our appointment. Want to reschedule? - https://connect.clinicname.com/book. Reply STOP to unsubscribe."
Choose Content Included in Your Messages
Select "Embedded link" and "Phone number". Ensure all other options are deselected.
-
- Click on Continue.
Step 9: User Consent
To comply with carrier regulations, you'll need to provide details on how your contacts give consent to receive messages and what your opt-in message looks like. Follow these steps:
Opt-In Method
-
Choose the Opt-In Method "Website Form" from the options.
Add Opt-In Form URL: Share a publicly accessible link to the website contact page form where users enter their phone number and opt in to receive messages.
Add the Opt-in Flow and Confirmation Message
Choose from the provided examples in the How do Contacts Opt-in to Messages? field and "Opt-in Message" field.
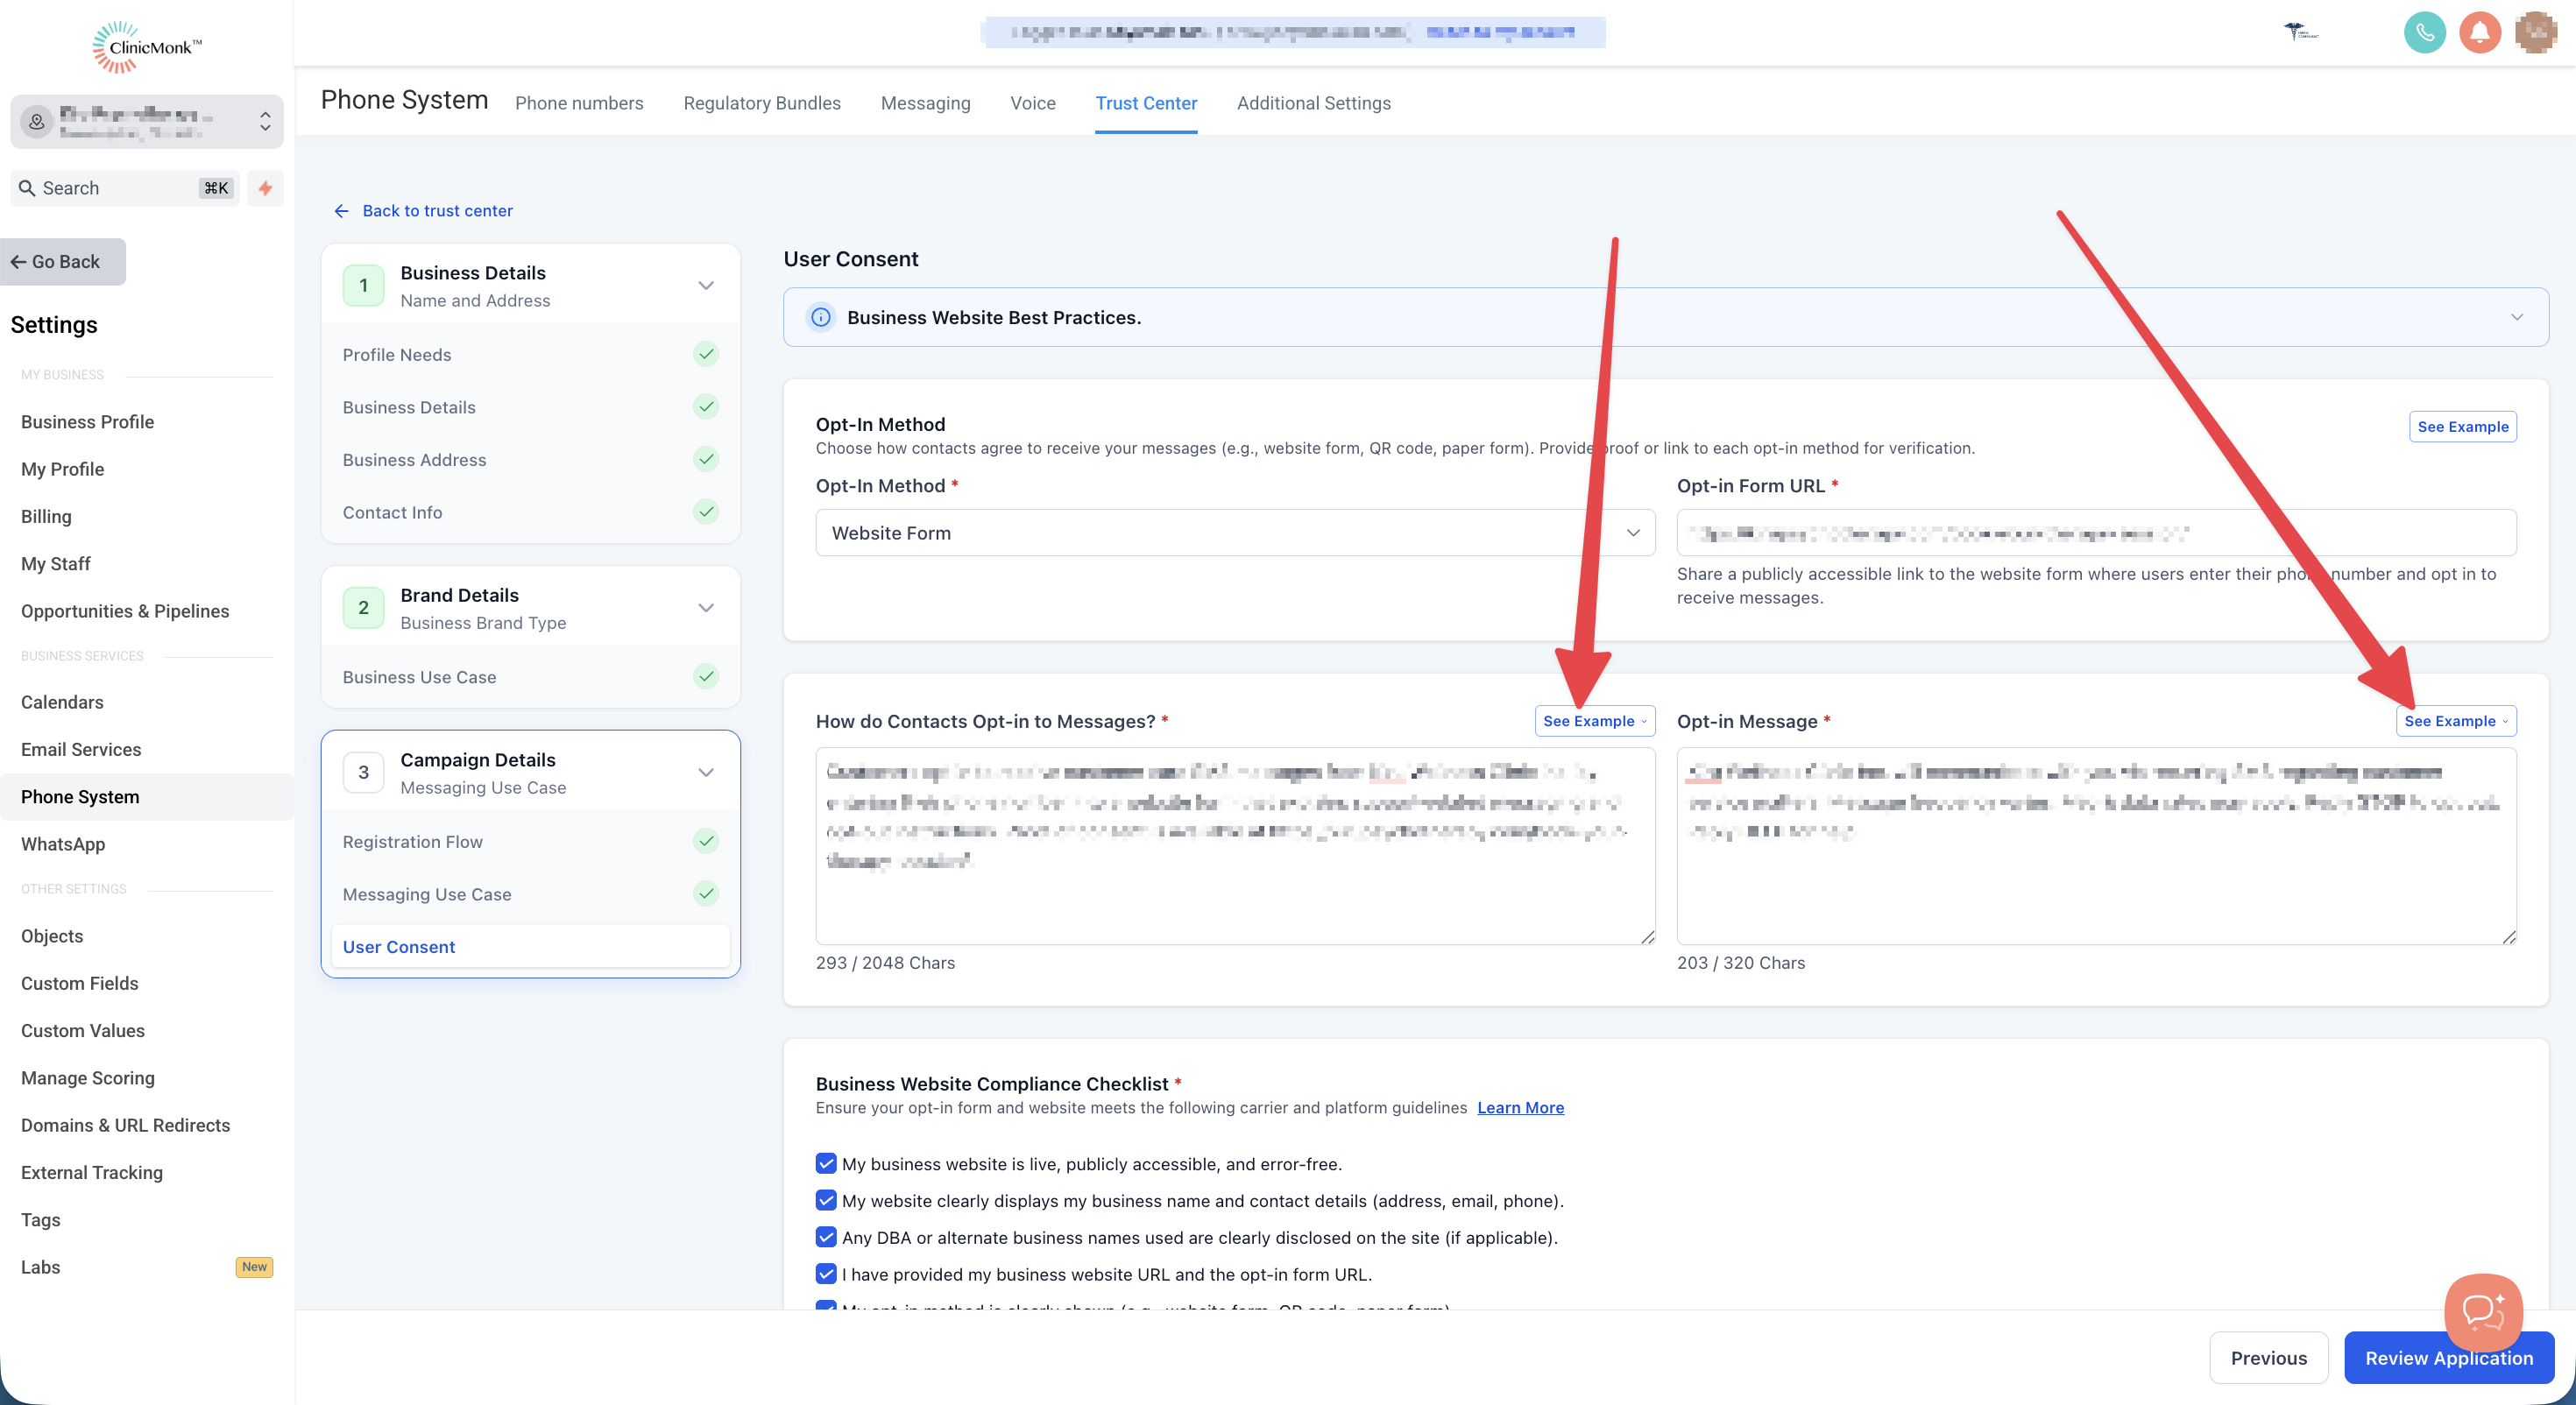
Business Website Compliance Checklist
Ensure your opt-in form and website meets the following carrier and platform guidelines.
Business Website Best Practices:
- Use a live, publicly accessible website with no broken links or "under construction" pages.
- Clearly display your business name and maintain consistent branding across your domain, website content, and legal policies.
- Clearly explain the services or products offered on your website.
- Provide visible and up-to-date Privacy Policy and Terms & Conditions pages.
- Ensure your opt-in form is easy to find and easy to understand, with CTIA-compliant language.
- Collect explicit SMS opt-in consent; consent must be clearly stated and not implied.
- Ensure sample messages accurately reflect your website content and intended messaging use case.
- Link social media icons directly to your brand's official pages (not generic platform homepages).
- Implement age-gating where required (e.g., alcohol, tobacco, or restricted content).
- Use social media pages or app store listings only as supporting proof if a full website is not available.
- Clearly display any DBA or alternate business names in the footer, Privacy Policy, or Terms & Conditions (if applicable).
Please select all items in the Website Compliance Checklist to proceed and click Review Application.
Our system will review your application, provide improvement suggestions, and display a Pass/Fail status. Make sure to address all flagged items and achieve a “Pass” across every section to maximize your chances of approval.
Once done, click on Proceed.
Review your details for the last time and click on Submit Application.
IMPORTANT NOTE
- Ensure all registration information matches government records exactly.
- Non-compliance or errors will result in rejection and additional fees.
- Consult a legal professional if unsure about privacy policy, terms of service, or messaging language.
- Be aware of fines for prohibited content, which can range from $500-$2,000 per violation.
Frequently Asked Questions
Q: Why was my brand rejected?
Likely reasons include EIN mismatch, invalid website, or use of a PO Box.
Q: Can I add new numbers after completing A2P Brand and Campaign Registration?
Yes. Any numbers you add after your brand and campaign are approved will be automatically registered under the same campaign — no resubmission is needed. It may take several days for registration to complete.
Q: How much does this cost?
Fees vary, checkout our article on Understanding A2P 10DLC Messaging Fees: Registration, Monthly, and Carrier Costs.
Q: Can I register multiple campaigns under one Standard Brand?
Yes, you can register multiple use-case-specific campaigns.
Q: I don't want to deal with all of this. Is there any alternative for me and my clients?
Yes, you can bypass A2P 10DLC by switching to Toll-Free Numbers. These also require registration, but the process is free and less complex. You can continue messaging in the U.S. without A2P 10DLC restrictions. See: Toll-Free Verification Guide for LC - Phone (US/Canada)
Q: Does this apply to only marketing campaigns or does it apply to all SMS?
A2P 10DLC is applicable for all Application-to-Person texting like marketing SMS, reactivation campaigns, appointment reminders, prospecting, billing alerts, 2FA login codes, etc.